| by
Max Wawrzyniak - St Louis, Missouri - USA
Bringing
a 1956 Johnson 15 hp Back to Life
Part
VII: Gentlemen:
start your engines
|
 |
Part
1 - Part
2 - Part
3 - Part
4 - Part
5 - Part
6
With the carb and magneto installed on the engine,
the carb throttle butterfly throttle valve "synchronized"
to the magneto, and the points gap set, we are now
ready to re-install the flywheel and "check for
spark:" i.e. see if the spark plugs actually
spark, indicating the all is well with the magneto
(ignition) system.
Carefully set the flywheel down onto the crankshaft,
making sure that the crankshaft "key" is
seating fully in it's keyway (slot) in the flywheel,
and that the flywheel is fully "down" on
the tapered crankshaft- do not use any grease or oil
on the crankshaft taper.
Slowly rotate the flywheel by hand (always clockwise,
looking down on the flywheel) and feel for any "dragging"
of the flywheel on the heels of the coil. The coil
heels need to be very close to the inner circumference
of the flywheel, but can not touch the flywheel. If
You feel something scraping or dragging on the flywheel
as you slowly rotate it, remove the flywheel and check
to see that the coil heels are properly aligned with
their mounting bossess as detailed in the discussion
concerning setting the "air gap" in part
#4 of this series.
Assuming that the flywheel rotates freely, I will
"spin-on" the flywheel nut finger tight,
and then "check for spark." One checks for
spark by taking a spark plug, attaching it to the
spark plug wire, "grounding" the outer metal
casing of the spark plug to a good "ground"
on the engine, and spinning the flywheel. Now, one
can hold the sparkplug against a ground with one's
hand, but be prepared for a pretty good shock assuming
the magneto is working. It is an old mechanic's joke
to ask the unsusupecting to hold the sparkplug against
a ground. If the victim jumps and drops the sparkplug
when the flywheel is spun, that is a sure sign that
the magneto is working properly.
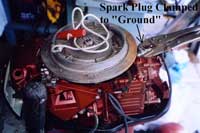 |
A spark plug
is clamped to a convenient bare-metal "ground"
on the engine for testing the "spark."
The spark plug is NOT touching the flywheel
(poor angle on the photo) |
My preference is to use locking pliers (Vice-Grips
or similar) to clamp the spark plug against a good
ground (preferably bare metal rather than painted)
on the engine. With a spark plug wire attached to
the plug, I will spin the flywheel either with a short
length of rope, or even by just "flipping"
the flywheel with the palms of my hands. If neither
spark plug is installed in the cylinder head, there
is little compression and the flywheel will spin very
easily. Good practice would dictate that the dangling
spark plug wire that is not being checked, should
be grounded to the engine to ease the strain on it's
coil, but I almost never bother with doing that and
have yet to suffer for it (See illustration above).
If the ignition system is in good condition, I can
easily spin the flywheel with my hands fast enough
to get one or two sparks. You should hear an audible
"snapping" noise and if the room is dark
enough, you should see a small blue or white spark
at the electrode end of the sparkplug. A yellow spark
is a weak spark indicating a problem somwhere, such
as dirty or improperly adjusted points, or a bad condenser.
Since both cylinders have completely separate ignition
systems, you will need to check both spark plug wires,
not just one.
If you have a nice spark on both spark plug wires,
you can now securely install the flywheel (I prefer
not to torque it down until I am sure that I have
the spark on both spark plug wires.) Re-install the
flywheel nut/washer/ cover plates as they were when
you first removed them (remember how I kept reminding
you to take photos and notes?) and if at all possible,
use a torque wrench to tighten the flywheel nut to
the factory recommended specs. You will find flywheel
nut torque specs along with other helpfull flywheel-installing
tips way back in the old Magnetos
column. If Chuckie is going to devote
storage space for all those old columns, there really
is no need to repost all of that stuff here as well.
If you don't get that flywheel installed correctly,
this
is what will happen.
Once the flywheel is torqued down, again rotate it
slowly by hand and check for any dragging or interference
with wires, etc. The spark plugs can be installed,
although before doing so you might want to use your
feller gauge to check to see if the gap between the
electrodes is .030 inches. I am in the habit of installing
new spark plugs out-of-the-box without bothering to
check the gap and the engines almost always run well,
but checking the sparkplug electrode gap is still
a good idea. If the gap is not correct, just bend
the over-hanging electrode a bit to correct it.
The last little bit of adjusting before we actually
try to start this thing is to set the high- and low-speed
needle valves to an intial setting for starting. If
you have a service manual it will most likely recommend
initial settings for these needle valves, but if you
lack the proper manaul, I would suggest beginning
with the high-speed (lower) needle valve opened about
3/4 of one rotation from the closed position, and
with the low-speed (upper) needle valve opened about
1 1/2 rotations from the closed possition. As mentioned
in part
#5 one must be very careful not to tighten
the needle valves against their seats as this can
easily damaged the soft brass needles. We had left
these needles about 1 full turn open but that may
have been changed by the tightening of the packing
nuts. Use extreme care to "bottom-out" these
needles as gently as possible. If you have a service
manual and the initial settings given are different
than those given above, use your manual's settings.
You will need a tank of fresh gasoline/oil mixture.
My opinion is that you can not go wrong mixing the
oil and gasoline at a 16 to 1 ratio for OMC outboards
up to about 1964, and 24 to 1 for post 1964 models.
This is a bit richer than the factory recommended
for some (but NOT all) models, but the potential for
damage due to too much oil is about nil, while the
potential for damage from too little oil is great.
I always err to the side of caution, especially if
the engine is to see hard use. I always use TCW-3
rated 2-cycle oil purchased at a large chain of discount
stores founded by a guy named Sam, which is about
the cheapest 2-cycle oil that I am aware of. I have
never had an issue
with it.
We are now ready to try to start the engine. My preference
is to try to start one in the privacy of my own driveway
by utilizing my "outboard motor test tank"
(plastic 55 gal. drum with the top cut off.) If you
prefer to haul the boat and engine down to the launch
ramp you can certainly try to start the motor with
the boat afloat. I almost always run into some little
problem that is easier to fix in the driveway with
the tools handy so I prefer to attempt to start the
engine there first (see Reviving
a Vintage Big Twin - Part 3)
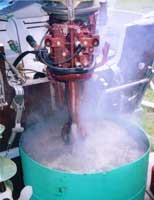
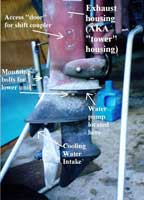 |
If at all possible,
make sure the water pump itself is submerged
in water; not just the water intakes. |
Since the plastic drum is a bit on the "wimpy"
side, I usually mount the engine on one of my boats
rather than attempting to clamp the outboard directly
to the plastic drum. A 3 hp or maybe a 5 1/2 are about
the biggest engines I will run clamped directly to
the drum. A metal oil drum could probably handle a
15 hp engine clamped to it. Although you want to be
sure that the lower unit is deep enough in the water
to submerge the cooling water intakes, it is better
to have it deep enough to submerge the actual pump
(see illustration above). Having the actual pump submerged
will prevent the impeller from running dry while trying
to pick up the prime. It only takes a few seconds
for an impeller running dry to be damaged, and I know
of one mechanic who "pre-lubes" his impellers
with KY Jelly, which apparently
does not harm them (insert your own joke here.) Keep
in mind that some lubricants might harm the rubber
impeller. My opinion is that if you submerge the engine
to the extent that the pump cavity is flooded there
is not need to worry about "pre-lubing."
Attach the fuel line and prime, using the primer pump
on a pressure tank, or the squeeze bulb for a fuel
pump-equiped engine, and check all your hoses and
connections for fuel leaks.
Apply the choke, grasp the starting rope handle and
gently pull until you feel the recoil starter engage
the flywheel, and then give it a good steady pull.
Do NOT grab the starter rope handle and jerk away
at it; feel for the engagement and then a steady rapid
pull.
Like the shampoo bottles say, "repeat as necessary."
 |
Running!! Note
that the motor is actually clamped to the transom
of the trailer-bound AF4 skiff, which makes
a much more solid mounting than trying to clamp
the engine directly to the wimpy plastic drum.
Also note the colling water spraying from the
exhaust relief hole halfway down the tower housing. |
Hopefully, after a few pulls the engine will start
up. It may be necessary for you to turn the choke
on and off repeatedly until the engine warms up: if
the engine is"coughing" back through the
carb and "jerking" as if it was hitting
something, most likely it is running lean. If it smooths-out
with out 1/2 choke, then you need to open the needle
valves just a bit more, no more than about 1/8 of
a turn without allowing a few seconds for the engine
to get used to the new setting.
If the engine is really smoking, it might be getting
too much fuel; make sure the choke is off and you
might try closing the needle valves just a tad, again
no more than 1/8 of a turn at a time.
Odds are you will accidently kill the engine at some
point when you guess wrong what it needs (more gas
or less gas??). Just keep playing with it.
If the thing doesn't start at all, have you flooded
it? Remove the spark plugs- are they wet with gasoline?
If so, allow the eninge to sit for a few minutes so
that the gasoline can evaporate, then re-install the
spark plugs and try starting again but use less choke
this time. if you pull the spark plugs and they are
completely dry, try using more choke or maybe opening
up the needle valves 1/8 of a turn each.
This can be a frustrating activity for the newbie,
but keep in mind that your engine ran well at some
point in the past, and if you did your work carefully
(and there is no damage that you overlooked- it does
happen) then it should run well again.
Once the engine has been running in a test tank,
THEN I will haul the boat down to the launch ramp
for an on-water test. Be advised that an engine that
appears to run OK in the tank may not necessarily
run properly on a boat, so don't load-up the family
and a picinic lunch for an afternoon of boating until
you have succesfully tested the motor on the boat
in the water. You will certainly have to "fine
tune" the needle valve adjustments. The proper
procedure is to warm up the engine on the boat, and
then head out at full throttle, slowing adjusting
thje high-speed needle until you get the most speed.
Then slow down and adjust the low- speed needle to
give you the best idle.
What went wrong with the first starting of the 1956
15? Well it started-up OK, but refused to pump cooling
water. I removed and re-installed the lower unit and
then all was fine so I just assume that I failed to
get the water tube seated in the grommet (seal) on
top of the water pump housing. As mentioned in part
#2 re-installing the lower unit can occasionally
try your patience. Take your time and don't get in
a hurry and remember that it took me (2) tries to
get the thing working properly.
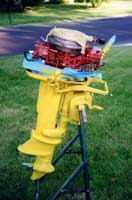 |
The '56 15 with
a coat of primer. Prep, primer & paint will
be covered in future columns when it's bit warmer
in the shop than it is right now. |
The plans are to repaint this engine as "nicely"
as possible without spending a lot of money on it,
and without making it look so "nice" that
I am scared to use it for fear of scratching it. But
winter is now upon us and my unheated shop is currently
full of antique aluminum boat and half-built kayak,
so the paint job will probably wait until spring unless
I get some decent breaks in the weather. So the next
few columns will deal with other subjects and then
eventually we'll get back to the 15.
Happy Motor'n
Max

click
here for a list of Columns by Max Wawrzyniak
|