| Part 1
Part2
I've been building so many boats lately, that I have
to stop and think about which one I am writing about
now. A peek in the shop shows that its the 10ft Nuthatch
that I've finally gotten around to constructing after
the PDF
model has been posted here at Duckworks
Magazine for over a year now. I think in the last
story
on building the PUD-g, I said I was next going to
start work on a driftboat design I had. That hull
has been put on hold for awhile so I can rethink the
size of the boat and make a few tweaks to the design.
But this story is about my first boats (the 8ft
Nuthatch) bigger brother the 10ft Nuthatch.
I also had several inquiries from readers as to when
I was ever going to get around to building it. So
here it is, and I'm going to spend more time with
this series of stories on the details that can cause
builders to throw down their tools and walk away from
their boat building projects. This part will deal
with the "big scary"in boat construction;
scarfing plywood to make longer sheets.
I have to admit that the thought of having to scarf
plywood breaks out the Costco sized bottle of Tums
for a quick hit. But once I have set up everything,
and start grinding away on the bevels, things improve.
It's just a mater of overcoming the initial fears
of a project. Like my first ever mix of epoxy, making
the first fillet, or ever working with fiberglass.
Baby steps turn into strides.
When I resized the lines from the 8ft to the 10
& 12ft versions of the Nuthatch, I made a decision
to change one of the side panel edges from a straight
line to an arc. This made a very big change in the
looks of the hull even though it added some extra
work in the lofting. But the extra effort in lofting
makes for a hull with more appealing lines. I love
holding the 10ft PDF model up on my finger tips and
just looking at it. Enough day dreaming and on to
building it.
I was conflicted on whether or not to use 5x10ft
sheets of plywood again on this hull or bite the bullet
and scarf. EdenSaw Woods made the decision for me
by being sold out of the 5x10 sheets of Okume or anything
else that might work. So it was time to practice my
scarfing abilities again. Scarfing is one of those
things that you have to work with a few times to become
really good at. Not to say that a first timer can't
do a good job; it can be done, but you have to be
diligent in your approach. Dave Nichols wrote a great
article
on scarfing earlier this year for Duckworks Magazine.
A good read and a lot of good information. I wanted
to take one last stab at scarfing a full stack at
one time, so I ordered my Anant
A8 plane online. I wanted to have a tool
long enough to cover the full face of the stacked
scarf and the upper and lower guide supports, and
maintain a "flat" surface. I had been using
a router mounted on a beefed up piece of plywood that
I ran up and down the scarf face. It worked ok, but
covered my shop in a layer of routed plywood chips;
and I mean covered. So I wanted to go in a quieter
and less dusty direction, and so the big hand plane.
I will keep using the plane, but will change my approach
to scarfing as you will read later.
 |
|
One of the things I didn't do at the very start,
was to reread my own directions on setting up the
plywood sheets for scarfing. By that I mean, which
side goes up. In my rush to use the new plane, and
to cut the "partial extension sheets", I
forgot which sides go up, and which sides go down
in the stack. On a scarfed panel, the outside "tip"
of the scarf points aft. Part of the planing is to
determine the "good" side from the bad,
and which you want to go on the outside. If you are
going to have a wood finished interior, you want the
good surface [with 1088 marine plywood this is can
be a coin toss (mainly which grain pattern you like
best)] on the inside. I am a confirmed painter, so
I try to put the good side out; to give me the best
surface for using high quality marine enamels and
LPU
paints. The hull's insides have a lot
of glass taped edges, backing blocks, and hardware
fittings that take away from any overall appearances.
So I always go with good on the outside.
A keen Duckworks eye will see that I had all the
sheets, good side up in the stack. The correct way
would have the "longer" plywood sheets,
bad side up, and the "shorter" sheets, good
side up. Then when you epoxy the two pieces together,
the short sheet flips over and both bad sides are
up and the good side tip will point aft. The boat
will still float no mater how you do it, so don't
sweat the details. Worry about it on the next boat
you build, and enjoy the one(s) you have.
 |
|
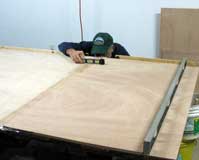
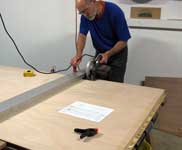
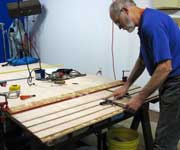
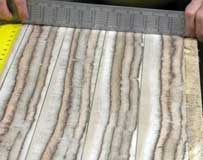
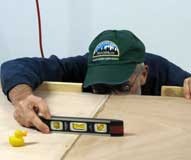
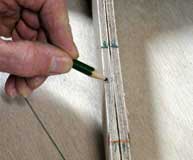
After the plywood sheets were squared up on the
sides and set back 3" each, it was time to break
out the new A8 hand plane. I did place some screws
in a few places to hold down any edges that wanted
to rise up. The screws were placed 3 1"2"
back from the leading edge to protect the plane's
blade. Having a level and flat surface to start with
is necessary for good results. Any vertical curves
in the plywood stack will become apparent when you
attempt to epoxy the mating faces together, and see
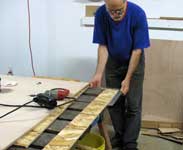
the horizontal arcs on the scarf edges. I also lifted
the whole stack 1/2", by placing spacers under
everything. I wanted to have a level and straight
support for the plywood sheet at the bottom of the
stack. The "extended and squared" support
also gave me something for the hand plane to use as
a lower guide, and some waste material to be planed
down as the scarf bevel deepened. This support piece
also helps keep the "thinning" edge from
being blown out.
 |
|
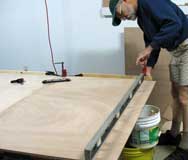
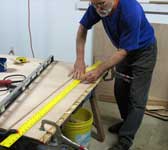
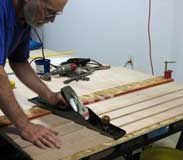
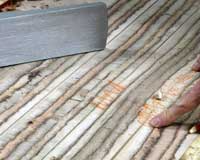
So I set the depth of the plane's "iron"
(lets be proper with names) and started with the first
long stroke. Have you thought about how much wood
I will be removing???? I hadn't ever thought about
it before, but was soon to learn. I have to cut bevels
3" wide, by 1/4" deep on one side, with
a running length of 16ft. That's taking a piece of
wood 1/2" thick, by 3" wide, by 4ft long
and planning it to oblivion. No wonder I was sweating
after a few minutes, and I had to spread the sweat
out over a couple of days. My arms thought they were
in boot camp again after doing hundreds of push ups
for no apparent reason, other than for the sardonic
pleasure of the TI. I think Dave Nichols has the right
idea about using the power plane.
 |
|
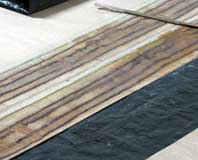
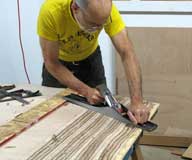
About halfway through the stack, I noticed that
I wasn't making much progress on the top sheets in
the stack. I discovered that I had my "upper
support guide" set too close, so I moved it from
6" to 9" behind the edge of the top sheet.
Then things were correct again and the bevel angle
changed to what it was supposed to be; and work progressed
towards completion. I noticed that I wasn't getting
the straight line ribbons that you should expect if
everything goes as planned (but I don't live in a
perfect world). When I got to the point where the
bevel started and stopped at the "correct"
in and out points, I still had some waviness in the
layers of plywood. Checks with a straight edge said
things seemed correct, but it just didn't look right,
so I marked those spots and did some fine tuning with
my smaller hand plane. Things seemed to improve, but
the straight edge checks said one thing and the eyes
said something else. After some futzing around, I
called it good enough. Things looked better, but I
still had doubts.
 |
|
To keep from fixating on one thing and not progressing,
I disassembled the stack and flipped the sheets around
so I could sand and seal the end grain of the plywood.
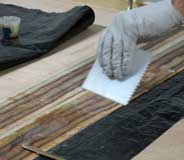
But before I apply the epoxy; I add a strip of 3"
shipping tape along the scarf's upper and lower edges
to keep excess epoxy from lumping up my good work
so far. I then mixed up 1 1/2oz of SilverTip
epoxy and brushed on all that the end
grain would absorb, and it took most of it. The rest
I used to epoxy a couple pieces of scrap plywood together
to use for rail clamps. Always have something around
that can use excess epoxy products. The panels ends
were left to cure overnight.
 |
|
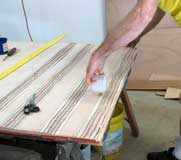
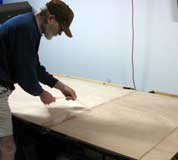
I removed one panel set from the work platform,
and got the other set lined up to epoxy together.
I clamp down the long sheet so I can do a dry fit
to find the correct "overall length". With
the short sheet placed so it is square and "level"
with the long sheet, I clamp a stop guide at the end
to mark this location. Then I'm sure that I can again
find the correct spot to place the short sheet after
the surfaces have been coated with epoxy.
Now it was time to get out the System Three GelMagic
and join these darn pieces of plywood so I can get
on with building the boat. Scarfing is about as much
fun as building the "true and square" frame
for a traditional style of boat. I've been using GelMagic
for all my bonding needs now, and it's the perfect
product for this application. Mix it up and put in
on, and it just sits there. On the sides of things,
underneath something, or in a gap. Stuck like, Uh,
glue.
The last time I had gone to the hardware store (my
local "Do It Center") to look for a new
3" putty knife to use to fair in the edges along
glass tape; I came across a "pointed toothed"
plastic spreading tool. Hum mm, how will this do with
epoxy? Great! I spread the GelMagic on the two scarf
faces and the toothed spreader (smallest teeth 1/16")
gave me a perfect and even coat along both surfaces.
I didn't have to worry about dripping thickened epoxy
running off either of the surfaces; even the one I
had to turn over.
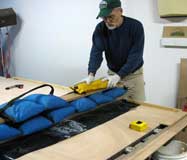
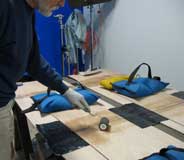
Then a check to see that the short sheet was lined
up back in it's proper place, and a straight edge
check of the mating edges. Then a layer of plastic
sheeting, topped with a "true" and straight
backing plate, and a layer of sand bags to hold everything
down. Time to cross my fingers and wait until the
epoxy cured overnight. Then do it again with the next
panel pair.
 |
|
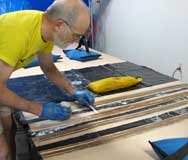
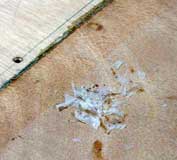
After the dust had settled so to speak, I removed
the shipping tape (with the excess epoxy I didn't
have to scrape up) and looked at my handy work. Better
than the last time, but not as good as the next. As
I said at the start of this story, scarfing is an
acquired skill, and to swim you to have to get in
the water. I did some touching up to the exposed scarf
tips, and added a layer of 3" glass tape to the
inside seams of all the panels. On the outside the
bottom panels get a layer of glass, and all the panels
are strengthened by the EZ-Fillet
and three layers of glass tape (two inside, one outside)
at the keel and chine seams. The top of the side panels
are stiffened by the rails. I've also changed the
way I layout the panel pairs on the lofting drawings,
so the bottom and side panel's scarf seams don't align
with each other. That holds true now for my multi-panel
designs; everything stair steps except the bottom
keel pair.
 |
|
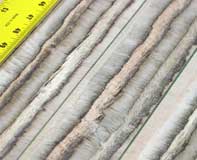
I didn't get enough GelMagic near the outer edges
of the scarf seam, and had a couple of gaps. But after
cutting out the panels, I had good fill along the
exposed interior cut faces of the edges. To reach
maximum strength, the very outer lengthwise ply, needs
to be as continuous as possible across the scarf joint.
A person might be able to get this by hand, but I
think that only a CNC machine under controlled supervision
could achieve this in the real world. A stressed (I
mean really bent) scarf joint will always break along
the outer seam; because of the discontinuous outer
lengthwise ply caused by the cut across it's face.
A layer of glass cloth (4 to 8" wide) added to
the outer and inner scarf seams will increase the
surface strength of the plywood for our real world
needs, and can be easily hidden by a good fairing
job. My best advise is don't sweat all the little
details, just get on with it. Build your boat the
best you can and go have fun. Don't worry about what
others say. "Only he who has built a boat can
row the first mile". Heard that somewhere; Chuck
maybe. ;)
 |
|
Please read Dave Nichols fine article
on scarfing after reading this story. He makes many
good points on the art. I will go to beveling only
one panel at a time on my next hull. I believe it
will give me greater control over the process, and
not have to worry about messing up sheet A if I make
a mistake in the stack on sheet B, C, or D. Adding
a power plane to my tool budget looks like a good
thing too. :) The best advise I can give is to take
some scraps and practice, practice, practice on your
scarfs, and to find the way that satisfies you! The
more you do, the better you will get.
I'm going to stop here with this part of the story.
Many of the little details about this boat's construction,
have been covered in other boat building articles
by me in the links that Chuck adds to the bottom of
this page. My next installment will probably concern
figuring out the angles and cutting the material for
the corner blocks. That has been a head banger at
times.
Check out my new flickr account for this boat; it's
link is https://www.flickr.com/photos/10ftnuthatch
I will be adding more photos as the construction progresses,
so come back often.
Thanks again for reading my stories.
Warren Messer
Red Barn Boats
On
to Part2

Other Articles by Warren Messer
|