| One of the things
that I've been trying to do as I build prototype boat
after prototype boat, is to learn from my mistakes.
For every two steps forward there is the occasional
step backward, and once in a while an evolutionary
step to the side. Speaking as a fish that grew legs,
I have to admit that the changes I've made in my technical
abilities of fit and finish can actually speed up
the process of building a boat. What seemed like lazy
short cuts at the time, have turned out to be paths
of enlightenment.
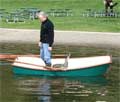
When I built the FlyCaster
prototype, I found that I was fighting myself when
finishing up the hull's exterior. The flaws in the
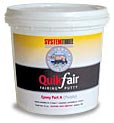
hull that should have been fixed and smoothed with
QuickFair
while I was still filling the weave in the fiberglass
cloth, and coating the hull with a layer of epoxy
couldn't be seen clearly; even when using a bright
hand held light. Several of the flaws only showed
up after I had applied the first of several coats
of System Three's WR-155
epoxy primer. That's the purpose of the
primer, but some of the dings and scratches were deeper
than what the primer can fix. Things that should have
been found and fixed before getting to the primer
stage. I don't use the WR-155 primer on every hull,
and most Duckworks readers won't go for the added
expense. Especially if you told your better half that
it was only going to cost $200 for a complete boat
- A price that even a Texas boat registrar would find
hard to believe. ;) So things need to be filled and
faired long before the paint goes on; and better yet
before the last couple of coatings of rolled on epoxy.
 |
|
While I was re-reading System Three's "Epoxy
Book", I studied the section on using pigmented
epoxy pastes. Basically, pure color pigments
added to part A epoxy. Just cut back the straight
part of the part A epoxy mix to equalize the added
amount of pigmented part A. I told myself to get some
pigmented paste when I had to resupply for building
the PUD-g
prototype hull. I got 2oz of white and 2oz of black
to add to the epoxy I used to filled the weave of
the cloth bottom. You will remember from the PUD-g
story that I put too much black in the
mix, and got a darker hull than I wanted. But I was
able to lighten up the tint of the hull before I painted
it white. Even with the wrong pigment paste mix, I
found several spots in the hull that needed attention
before getting around to the painting. Most of the
fixes needed were from not doing the best job of fairing
that I could do. Mainly from an accumulation of bad
lighting, bad eye sight, and the low color tone contrast
between the various shades of white from the different
layers of cured QuickFair.
 |
|
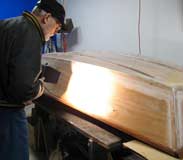
As I was fairing out the daggerboard on the PUD-g
with a second coat of QuickFair, I vented some brain
gas. During that thought, the idea of using some of
the black pigment paste in the QuickFair came to me.
I think the fish can walk! So I added just a smidgen
of the black paste to the mix and stirred. After a
couple of seconds, I thought I was making licorice,
or maybe even black plastic. It was some weird looking
stuff. But as I was spreading it on the daggerboard,
I knew this was going to work, and big time. This
was something to try on the next hull, by adding it
again to the SilverTip
epoxy coatings, AND the QuickFair.
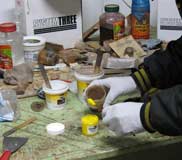
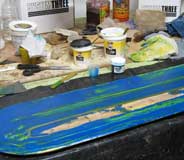
When I got the glass cloth for the bottom of the
10ft
Nuthatch, I picked up 2oz of yellow and
2oz of blue pigmented pastes; and yes, if you mix
them together (or overlaid) you get green, as you
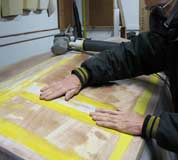
can see in several of the photos. The first layer
of QuickFair I left uncolored, and just faired it
in as normal. The only application change I made,
was to use a new 3" putty knife, which worked
out well. Not too wide, and not too narrow.
 |
|
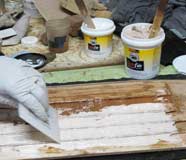
After a night of curing, and a good sanding with
100 grit, it was time for the second coat to fill
in the scratches and low spots from the first pass.
To this I added maybe a 1/4 teaspoon of yellow pigmented
paste, and mixed it in. I tried adding the pigment
paste to the mix in a couple of different ways. Once
mixing it in to the part A of the QuickFair, and then
adding the part B with a final mix; and adding the
paste after mixing parts A and B. Seems to work both
ways, but I liked adding the paste after mixing the
A and B so I knew that the main mix was complete.
Again I thought I was making some kind of plastic,
but this time it was yellow. Strange looking stuff,
and it was a very bright yellow.
 |
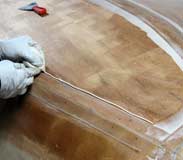
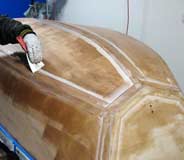
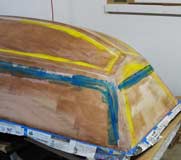
It still went on like normal QuickFair, and boy did
it stand out. You could see exactly where it was,
and wasn't going down. All the low spots were yellow,
and all the high and smooth spots were the off white
color of cured fairing compound with maybe a staining
tint of yellow left behind. It looked kind of blotchy
with the mixing of colors, but it would all get covered
again with a third, blue tinted coating, which on
the yellow areas went green, and on the white parts
stayed blue. The upturned hull started to look like
an over sized parakeet.
 |
|
 |
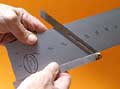
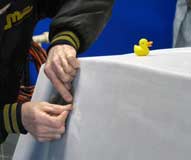
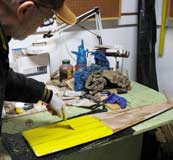
Time for a bit of lateral arabesque on using pigmented
pastes to the plot of this story. Another thing I
picked up in the System Three Epoxy Book, was using
a "toothed" spreader (like you would use
to apply thick adhesives for linoleum and flooring
tile) to fair in deeper voids and low spots on a larger
hull cursed with boat pox. The 4 sided plastic spreader
I used to even out the GelMagic when I scarfed the
panels for the 10ft Nuthatch, had three sizes of teeth.
I used the middle length side of the spreader to apply
un-tinted QuickFair to the rudder and daggerboard.
This let me control the amount of fairing compound
I would be adding, and to leave behind a much smaller
surface area to have to sand and shape after it had
cured. Instead of having a large semi-flat area to
have to sand back to the NACA
outlines I wanted; I only had to shape the tops of
the "grooves" that the toothed spreader
left behind. The sanding and shaping went much quicker
than ever before, and all I had to do now was to fill
in the low spots and do the final touch ups and finish
sand.
 |
|
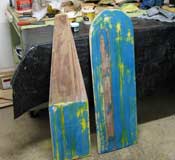
For the second fairing coating on the rudder and
daggerboard, I used the yellow paste. It didn't take
that much, since most of the major filling was done
on the first coat. I used a straight edged applicator
for this layer. The next time I do this, I think I
might do the second layer with the smaller teeth on
the spreader just to see what happens. That would
fill the big grooves, but give me a second chance
at shaping the outline of the foils. One thing to
be cautious of is applying the fairing compound too
thin; as it may not want to stick in the very thin
spots if the area hasn't been sanded that well. It
would be better to apply a couple coats of straight
epoxy and sand that to the final shape if you are
just trying to get rid of small scratches. The paint
you use may get rid of them too; if not this time
around, then maybe the next. Remember it's a boat
in your yard, and not a priceless artifact at the
Smithsonian.
 |
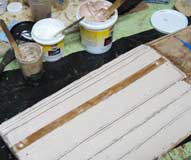
After giving everything a good sanding with 100
grit, I looked and felt around the hull for imperfections,
and marked any I found with either a green or orange
pencil. For the final layer of fairing compound, I
mixed in the blue pigment paste. QuickFair is smooth
and creamy to begin with, but adding the pigment pasted
to it is an other worldly experience. I can't explain
it; you just have to try it yourself and see what
I mean when you add the colors.
 |
|
 |
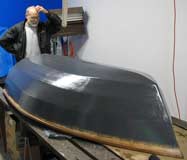
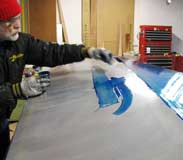
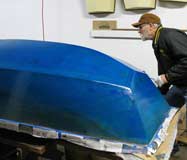
Now it was time to fill in the weave of the glass
cloth on the bottom of the hull and give everything
else a coating of epoxy. On these coats, I added some
blue paste to the straight epoxy to give it some color
and to give the paint I was going to use a good deep
base. This hull was going to be "Shaw Island
Blue", and was a pretty close match to the color
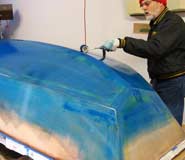
of the blue pigmented paste. Each coating of epoxy
added more base color to the hull; and I think that
if I had added more paste into the mix, I wouldn't
have needed to paint the hull. I will have to try
this some time with a daggerboard to see if it works
out better that way, than with just a coating of epoxy,
and paint. The epoxy will be more flexible, and less
likely to chip when dinged than when top coated with
paint.
 |
|
 |
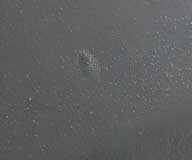
A good look and feel after everything cured, showed
me a couple of spots that needed some touching up.
If it was going to be my own boat, I wouldn't have
given it a second thought; but I need to sell some
hulls to make room for all the others (10) than need
to be made. Because I have to make them as flawless
as possible for a potential customer; out came the
sander again, with more fairing compound, and sealing
coats of epoxy.
My hull surfaces are not yet as smooth as gel coated
fiberglass, but getting damn close. I'm finding that
good lighting is the key to flaw detection, and some
changes need to be made at the Red Barn. I need to
change the tubes in my florescent fixtures from the
"warm" 3200k's (degrees kelvin) I'm using
now, to the higher "day lite" 6400k's. Also
adding a couple of windows would help too. An even
better option would be to move to a place I found
in Port Townsend that has a 40x48 foot heated shop.
I would also benefit from the more than halving in
my property taxes by the move. More money to build
boats with, and closer to some excellent sailing waters.
:)
I hope that all my thrashing about at the waters
edge helps you in your own boat building endeavors.
Try using pigmented pastes on your next or current
projects; it really adds to the value of your finished
work. Thanks again for reading my stories.
Warren Messer
Still evolving at
Red Barn Boats

Other Articles by Warren Messer
|